Laravel Telescope: Debugging Made Easy (Part - 1)

Laravel Telescope is a powerful debugging tool built into the Laravel framework. It acts as a one-stop shop for inspecting your application's inner workings, streamlining development and troubleshooting. This blog post will delve into Telescope's features, providing code examples and security considerations for its use.
Installation and Configuration
To get started with Telescope, follow these steps:
- Installation:
- Open your terminal and navigate to your Laravel project's root directory.
- Run the following command to install Telescope using Composer:
composer require laravel/telescope --dev
The --dev flag indicates that Telescope is a development dependency and won't be included in your production environment.
- Publishing Assets and Migrations: Publish Telescope's assets and create the necessary database table using the following command:
php artisan telescope:install
This command will publish Telescope's configuration file (config/telescope.php) where you can customize certain behaviors.
- Database Migrations: Run the database migrations to create the Telescope table:
php artisan migrate
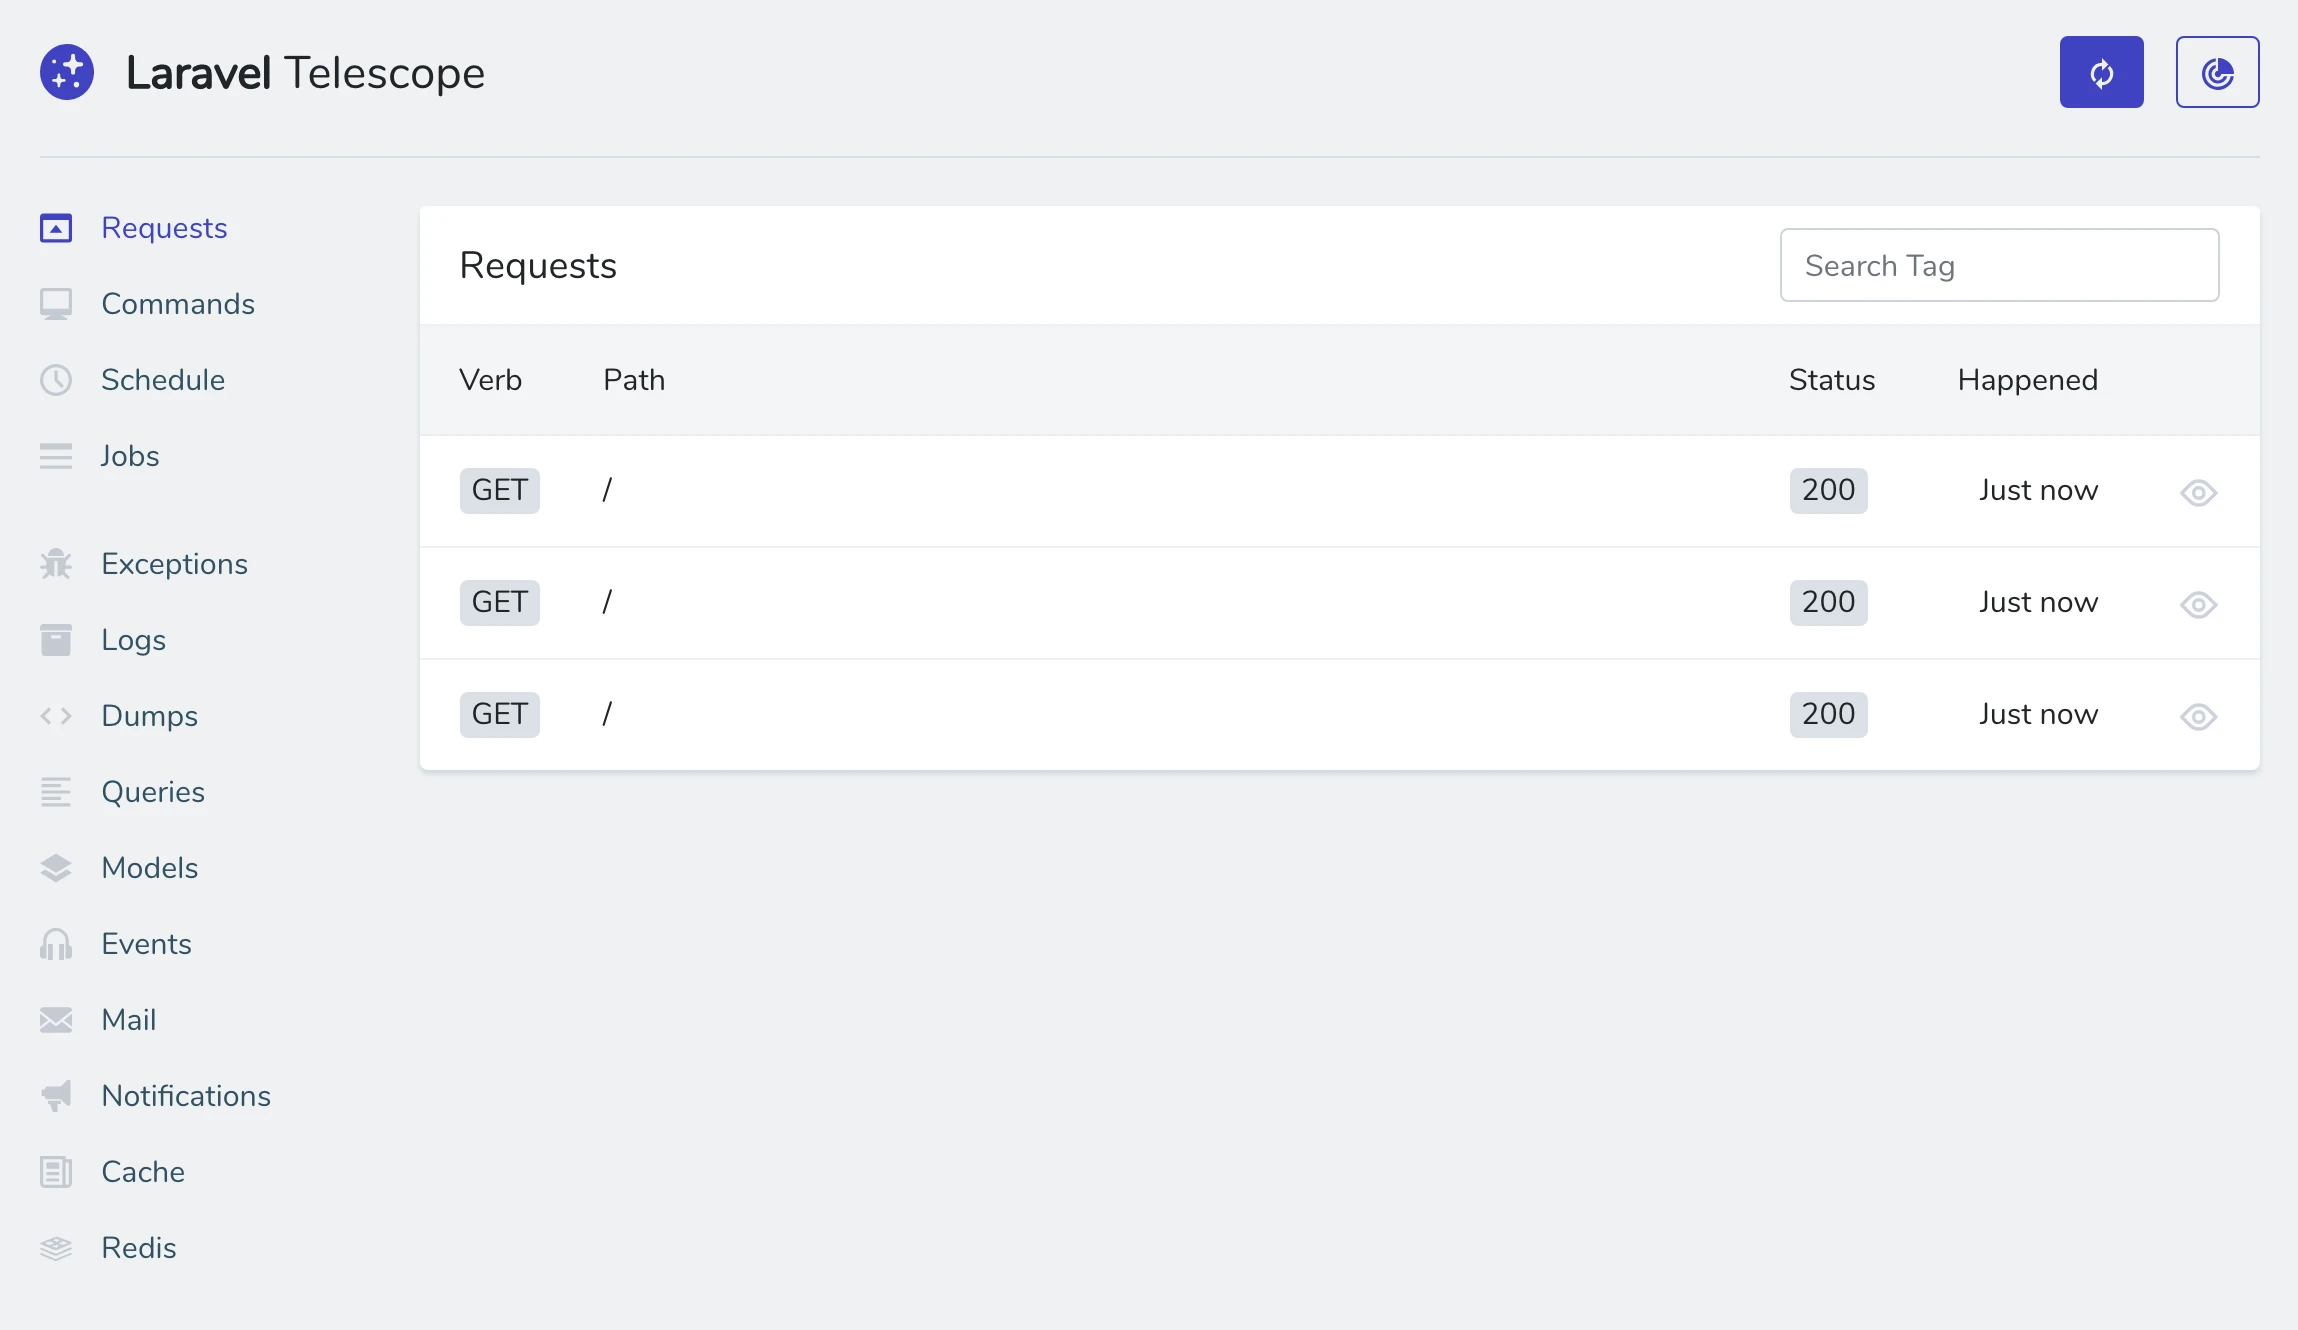
- Access Telescope: With Telescope installed and configured, you can access the Telescope dashboard by visiting the following URL in your browser (replace localhost with your development server's address if necessary):
http://localhost:8000/telescope
You'll likely be prompted to log in using your Laravel application's authentication credentials.
Primary Configurations (Optional):
The default configuration for Telescope works well for most development scenarios. However, you can customize some aspects in the config/telescope.php file:
- Storage Driver: Telescope allows you to store recorded entries in different locations like the database (default) or Redis. You can change the storage driver by modifying the
STORAGE_DRIVERsetting. - Watchers: Telescope automatically monitors various aspects of your application by default. You can enable or disable specific watchers using the
ENABLED_WATCHERSsetting. - Authorization: Telescope leverages Laravel's authorization system to control access. You can define custom authorization logic for Telescope in the
gatemethod of theTelescopeServiceProvider.
Leveraging a Separate Database for Laravel Telescope
Laravel Telescope, a powerful debugging tool, typically stores its data in the same database as your primary Laravel application. However, you might prefer to use a separate database for Telescope for various reasons, such as:
- Isolation: Maintaining Telescope data separately ensures it doesn't interfere with your application's core data.
- Performance Considerations: If your application experiences high traffic or data volume, dedicating a database for Telescope can enhance performance.
- Security: Storing Telescope data on a separate database, ideally one not accessible from the internet, can add an extra layer of security.
Here's how to configure Telescope to use a dedicated database:
- Create the Separate Database:
- Use your preferred database management system (e.g., MySQL, PostgreSQL) to create a new database specifically for Telescope.
CREATE DATABASE telescope;
- Update Laravel's
.envFile:
- Open the
.envfile located in your Laravel project's root directory. - Define the following environment variables to connect Telescope to the separate database:
TELESCOPE_DB_CONNECTION=telescope_db  # Name you choose for the connection
TELESCOPE_DB_HOST=localhost   # Replace with your separate database host
TELESCOPE_DB_PORT=3306   # Replace with your separate database port
TELESCOPE_DB_DATABASE=telescope  # Replace with your separate database name
TELESCOPE_DB_USERNAME=root  # Replace with your separate database username
TELESCOPE_DB_PASSWORD=password  # Replace with your separate database password
Update the Laravel database configuration file (config/database.php) for the Telescope connection, you would add a new entry in the connections array.
Here's how you can do it:
'telescope_db' => [
    'driver' => env('TELESCOPE_DB_CONNECTION', 'mysql'),
    'host' => env('TELESCOPE_DB_HOST', '127.0.0.1'),
    'port' => env('TELESCOPE_DB_PORT', '3306'),
    'database' => env('TELESCOPE_DB_DATABASE', 'forge'),
    'username' => env('TELESCOPE_DB_USERNAME', 'forge'),
    'password' => env('TELESCOPE_DB_PASSWORD', ''),
    'unix_socket' => env('TELESCOPE_DB_SOCKET', ''),
    'charset' => 'utf8mb4',
    'collation' => 'utf8mb4_unicode_ci',
    'prefix' => '',
    'strict' => true,
    'engine' => null,
],
- Create the Telescope Database Migration (Optional): If the separate database doesn't already have the Telescope table structure, you can create it by running the following command:
php artisan telescope:install --database=telescope_db # Replace with your chosen connection name
This command will publish Telescope's assets and create the migration specifically for the telescope_db connection.
- Restart Your Development Server:
Ensure your development server is restarted to pick up the changes made to the
.envfile.
With these steps, Telescope will now utilize the separate database you created.
Note:- By effectively using a separate database for Telescope, you can streamline your development process while maintaining data isolation and security considerations.
Security in Mind
While Telescope is a fantastic debugging tool, security is paramount.
Here's what to consider:
- DO: Enable Telescope only in local development environments. DON'T: Expose Telescope in production!
- DO: Leverage Laravel's authorization features to restrict access to the Telescope dashboard. DON'T: Grant everyone access.
- DO: Regularly update Telescope to benefit from security fixes and improvements. DON'T: Use outdated versions.
By following these security practices, you can leverage Telescope's debugging power without compromising your application's security.
Make a note to cover implementing Laravel authorization to restrict access to the Telescope dashboard and more security tips along with Laravel 11 updates in Part 2.
Happy Coding!
- Tags:
- #Laravel
- #Debugging
Author: Sonu Singh
With over 7 years of dedicated experience in web development, I've traversed through the dynamic landscape of digital technology, honing my skills and expertise across various frameworks and content management systems. My journey began with the exploration of frameworks like CodeIgniter, CakePHP, Yii, and eventually, I found my passion in Laravel - a framework that resonated deeply with my love for elegant, efficient code. Throughout my career, I've had the privilege to contribute to numerous projects, ranging from small-scale ventures to large, enterprise-level solutions. Each project has been a unique opportunity to push boundaries, solve intricate challenges, and deliver innovative solutions tailored to meet client needs. One of my proudest accomplishments includes the development of a SaaS-based project using Laravel and MySQL. This venture not only showcased my technical prowess but also demonstrated my ability to conceptualize, design, and execute scalable solutions that drive business growth. In addition to my proficiency in development, I've also delved into server deployment and query optimization, ensuring that every aspect of a project - from its codebase to its infrastructure - is optimized for peak performance and reliability.
Recent Posts
How to Generate a Package in Laravel and Why It's Important
Manish Kumar
22 Jul 2024

Writing Clean Code in Laravel: Principles and Tools
Manish Kumar
15 Jun 2024
Basic Useful Commands for Developers
Manish Kumar
12 Jun 2024
Exploring Key Design Patterns in Software Development
Manish Kumar
29 May 2024
Laravel Telescope: Debugging Made Easy (Part - 2)
Sonu Singh
25 Apr 2024

Subscribe to Newsletter
Provide your email to get email notification when we launch new products or publish new articles